Ares electric commuter bike assembly

These assembly instructions are for customers who are looking to assemble the Ares electric bike themselves. We're also able to offer a personalised delivery and assembly service, simply add this option to your order.
Before you assemble the Ares electric bike you will need a few tools 🛠
Cup of tea or coffee ☕️
Cable cutters (for cutting cable ties)
Allen or hex key set (3, 4, 5, 6mm)
10 and 15mm spanner 🔧
Cable cutters (for cutting cable ties)
Allen or hex key set (3, 4, 5, 6mm)
10 and 15mm spanner 🔧

Carefully lift out the Ares electric bike and contents from the box.
Using a pair of cable cutters remove the cable ties securing the front wheel to the frame, DON'T USE a knife as it's easy to slip and scratch the frame.
Carefully remove the front wheel noting that the crank is positioned inside the wheel spokes.
Fit the front wheel in the forks by carefully making sure the brake rotor is located in the callipers. Add the securing washer making sure it's located in the hole in the fork and tighten the nut with a 15mm spanner.

Release the remaining cables ties that are securing the rear rack and handlebars to the bike frame.
Locate the headset cover and cable tidy "thingy" in the accessories box. This fits over the headset, (see photo below).
Locate the headset cover and cable tidy "thingy" in the accessories box. This fits over the headset, (see photo below).

Add handlebar assembly to frame, (see photo below).

Once the handlebar assembly is roughly at the correct height, remove rubber cap and tighten the headset, (see photo below).

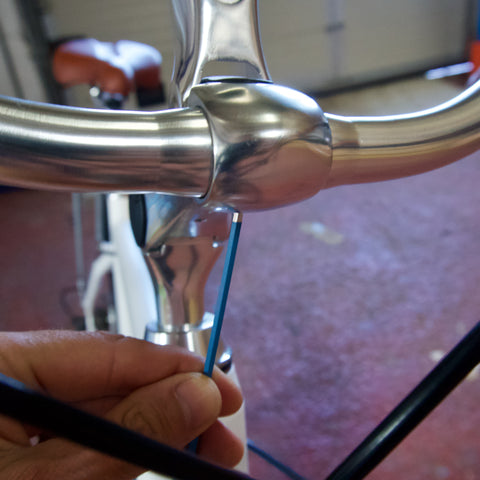
The angle of the handlebar assembly can be adjusted by opening the lever and adjusting the height to suit. Close the lever and check for movement in the handlebars, if the lever is too tight to close, or if when closed there is movement in the handlebar then the barrel adjuster can be adjusted by inserting an Allen key and turning the barrel adjuster. Moving from right to left tightens, (photo below).

The actual handlebar can also be tilted up/down by releasing the grub screw (see photo below) located under the handlebar and by releasing the barrel adjuster, once rotated to the desired angle tighten the grub screw and adjust the barrel adjuster back to create a tight fit.

Tidy the cables by locking in the headset cover, (see photo below).

Remove front light assembly using a 5mm Allen key and 10mm spanner.
The front mudguard feeds through the fork from the rear with the mounting bracket at the front of the mudguard, (see photos below).
Install the front light but now also add the mudguard to the screw before the nut is added, (see photo below).
The front mudguard feeds through the fork from the rear with the mounting bracket at the front of the mudguard, (see photos below).
Install the front light but now also add the mudguard to the screw before the nut is added, (see photo below).


Add the mudguard mounting stays to the frame using 4mm Allen key.
Add pannier to frame using 3mm Allen key.
Add pannier to frame using 3mm Allen key.

Add seat post to frame and tighten using a 6mm Allen key, make sure seat is horizontal, adjust if required.
Add pedals, and tighten with a 15mm spanner, noting that the left pedal is reverse thread so turn counter clockwise to tighten.
Add pedals, and tighten with a 15mm spanner, noting that the left pedal is reverse thread so turn counter clockwise to tighten.

Finally pump up the tyres.
CONGRATULATIONS your new electric bike is ready to go.
Once assembled the rider can fine tune the fit by adjusting the seat height as well as seat fore and aft positioning. The handlebar height, angle and rotation can also be fine tuned.
CONGRATULATIONS your new electric bike is ready to go.
Once assembled the rider can fine tune the fit by adjusting the seat height as well as seat fore and aft positioning. The handlebar height, angle and rotation can also be fine tuned.

